Modify
toolbar:
 Modify
menu: Move
Modify
menu: Move
Command
line: move
Select
objects: Use an object selection method and press ENTER when you
finish
Specify
base point or displacement: Specify a base point (1)
Specify
second point of displacement or
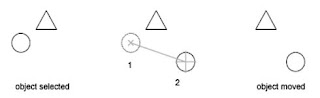
The two points
you specify define a displacement vector that indicates how far the selected
objects are to be moved and in what direction. If you press ENTER at the
Specify Second Point of Displacement prompt, the first point is interpreted as
relative X,Y,Z displacement. For example, if you specify 2,3 for the base point
and press ENTER at the next prompt, the object moves 2 units in the X direction
and 3 units in the Y direction from its current position.
IV.2 COPY
Command
line: copy
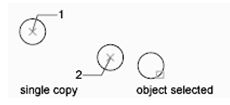
Select
objects: Select objects and press ENTER
Specify base point or displacement, or [Multiple]: Specify
a point for a single copy or enter m for multiple copies
Base Point or displacement
Makes
a single copy.
Specify
second point of displacement or
If you specify two points, AutoCAD uses the first point as a
base point and places a single copy relative to that base point. The two points
you specify define a displacement to determine how far the selected objects are
moved and in what direction.
If you press ENTER at the
Specify Second Point of Displacement prompt, the first point is interpreted as
a relative X,Y,Z displacement. For example, if you specify 2,3 for the base point and press ENTER
at the next prompt, the object moves 2 units in the X
direction and 3 units in the Y direction from its
current position. In this case, the first point is usually entered at the
keyboard.
Note The @ symbol should not be entered as
part of this displacement coordinate.
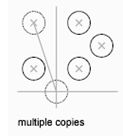
Multiple
Makes
multiple copies using one COPY command. AutoCAD prompts for an insertion base
point for the selection object.
Specify
base point:
Specify
second point of displacement or
If you specify a point, AutoCAD places a copy at that point
relative to the base point. The Specify Second Point of Displacement prompt is
repeated for placement of multiple copies of the object. If you press
ENTER, the command ends.
IV.3 TRIM
Trims objects at a cutting edge
defined by other objects
Modify
toolbar:

Command
line: trim
Current
settings: Projection = current Edge = current
Select
cutting edges...
Select
objects: Select one or more objects and press
ENTER, or press ENTER to select all objects (implied
selection)
Objects
that can be trimmed include arcs,
circles, elliptical arcs, lines, open 2D and 3D polylines, rays, splines,
hatches, and xlines.
Select the
objects that define the cutting edges at which you want to trim an object, or
press ENTER to select all objects as potential cutting edges. Valid cutting
edge objects include 2D and 3D polylines, arcs, circles, ellipses, lines,
layout viewports, rays, regions, splines, text, and xlines. Trim projects the
cutting edges and the objects to be trimmed onto the XY plane of the current
user coordinate system (UCS).
Select
object to trim or [Project/Edge/Undo]: Select an object to trim,
press SHIFT and select an object to extend, or enter an option
When AutoCAD
prompts you to select boundary edges, you can press ENTER and select the object
to be trimmed. AutoCAD trims the object against the nearest candidate. You can
use only the single, crossing, fence, and implied selection options to select
boundaries that include blocks.
Object
to trim
Specifies the object to trim.
AutoCAD repeats the prompt for the object to trim so that you can trim multiple
objects. Pressing SHIFT while selecting an object extends it to the nearest
boundary rather than trimming it. Pressing ENTER ends the command.
If the selection point is between
the end of the object and a cutting edge, TRIM removes the portion of the
object that extends beyond the cutting edge. If the selection point is between
two cutting edges, the portion between is deleted and the portions outside are
preserved, turning one object into two.
AutoCAD trims 2D wide polylines at
their center lines. If the polyline is tapered, the width at the cutting edge
is the same after trimming. The ends of a wide polyline are always square.
Cutting a wide polyline at an angle causes portions of the end to extend beyond
the cutting edge. Trimming a spline-fit polyline removes the curve-fit
information and changes the spline-fit segments into ordinary polyline
segments.
Undo
Reverses the most recent change
made by TRIM.
IV.4 EXTEND
Extends an
object to meet another object
Modify
toolbar:

Command
line: extend
Objects
that you can extend include arcs, elliptical arcs, lines, open 2D and 3D
polylines, and rays.
Object
To Extend
Specifies the
object to extend. AutoCAD repeats the main prompt so that you can extend
multiple objects. Pressing SHIFT while selecting
an object trims it to the nearest boundary rather than extending it. Pressing ENTER ends the command
Undo
Reverses the most recent changes
made by EXTEND.
IV.5 MIRROR
Creates a mirror
image copy of objects
Modify
toolbar:

Command
line: mirror
Select
objects: Use an object selection method and press
ENTER to finish
Specify
first point of mirror line: Specify a point (1)
Specify
second point of mirror line: Specify a point (2)
The two
specified points become the endpoints of a line about which the selected objects
are reflected. In 3D, this line orients a mirroring plane perpendicular to the XY
plane of the user coordinate system (UCS) containing the mirror line.
Delete
source objects? [Yes/No] : Enter y or n, or press ENTER
Yes
Places the
reflected image into the drawing and deletes the original objects.
No
Places
the reflected image into the drawing and retains the original objects.
To manage the
reflection properties of text objects, use the
MIRRTEXT system variable. The default setting of
MIRRTEXT is 1 (on), which causes a text object to be
mirrored just like any other object. When
MIRRTEXT
is off (0), text is not
IV.6 ROTATE
You
can rotate objects around a specified point. To determine the angle of
rotation, you enter an angle value or specify a second point.
Entering a
positive angle value rotates the objects counterclockwise or clockwise,
depending on the Direction Control setting in the Drawing Units dialog box. The
plane of rotation and the direction of the zero angle depend on the orientation
of the user coordinate system.
Rotate an Object by a Specified Angle
You Rotate objects by choosing a
base point and a relative or absolute rotation angle. Specify a relative angle
to rotate the object from its current orientation around the base point by that
angle. Specify an absolute angle to rotate the object from the current angle to
a new absolute angle.
You can rotate an object by
specifying a relative angle using one of two methods:
§
Enter a rotation angle value from 0 to 360
degrees. You can also enter values in radians, grads, or surveyor bearings.
§
Drag the object around the base point and
specify a second point. Turning on Ortho and Polar Tracking, or using object
snaps for the second point, is often useful with this method.
In this example, you rotate the
plan view of a house by selecting the object (1), specifying a base point (2),
and specifying an angle of rotation by dragging to another point (3).
Rotate an Object to an Absolute Angle
Sometimes it is easier to rotate to
an absolute angle with a reference option.
In the following example, you
specify the reference angle by selecting two points on the object to rotate.
You select the object to be rotated (1), specify the base point (2) by using
the Midpoint object snap on the window shown, and then use the Reference option
to specify the angle of rotation. For the reference angle, specify two points:
the midpoint of the window (2) and the endpoint of the window (3). Rotate the
window by dragging it and specify the endpoint of the wall (4).
IV.7 SCALE
Enlarges
or reduces selected objects proportionally in the X, Y, and Z directions
Modify
toolbar:

Command
line: scale
Select
objects: Use an object selection method and press
ENTER when you finish
Specify
base point: Specify a point (1)
The
base point you specify identifies the point that remains in the same location
as the selected objects change size (and thus move away from the stationary
base point). Drag the cursor to make the image larger or smaller.
Specify
scale factor or [Reference]: Specify a scale or enter r
Scale
Factor
Multiplies
the dimensions of the selected objects by the specified scale. A scale factor
greater than 1 enlarges the objects. A scale factor between 0 and 1 shrinks the
objects.
Reference
Scales
the selected objects based on a reference length and a specified new length.
Specify
reference length <1>: Specify a distance or
press ENTER
Specify new length: Specify a distance
If
the new length is longer than the reference length, the objects are enlarged.
IV.8 STRETCH
Moves
or stretches objects
Command
line: stretch
Select
objects to stretch by crossing-window or crossing-polygon...
Select
objects: Use the cpolygon or crossing object
selection method (1 and 2) and press ENTER when you finish
AutoCAD
stretches arcs, elliptical arcs, lines, polyline segments, 2D solids, rays,
traces, and splines that cross the selection window. STRETCH moves the
endpoints that lie inside the window, leaving those outside the window
unchanged. STRETCH also moves vertices of traces and 2D solids that lie inside
the window and leaves those outside unchanged. Polylines are handled segment by
segment, as if they were primitive lines or arcs. STRETCH does not modify 3D
solids, polyline width, tangent, or curve-fitting information.
AutoCAD moves any objects entirely within
the window or polygon, as if you were using MOVE.
Specify
base point or displacement: Specify a point (3) or press ENTER
Specify
second point of displacement: Specify a point (4) or press ENTER
If you enter a second point, the
objects are stretched the vector distance from the base point to the second
point. If you press ENTER at the Second Point of Displacement prompt, STRETCH
treats the first point as the X,Y displacement value.
IV.9 OFFSET
Creates concentric circles,
parallel lines, and parallel curves
OFFSET creates a new object at a
specified distance from an existing object or through a specified point.
Modify
toolbar:

Command
line: offset
Specify
offset distance or [Through]
<current>: Specify a distance, enter t, or press ENTER
Offset
Distance
Creates
an object at a specified distance from an existing object.
Select
object to offset or : Select one
object or press ENTER to
end the command
Specify
point on side to offset?: Specify a point (1) on
the side of the object you want to offset
AutoCAD
®
repeats the two prompts so that you can create multiple offset objects. To end
the command, press
ENTER at the Select Object to
Offset prompt.
Through
Creates
an object passing through a specified point.
Select
object to offset or : Select one
object or press ENTER to
end the command
Specify
through point: Specify a point (1) through which
you want the offset object to pass
AutoCAD
repeats the two prompts so that you can create multiple offset objects. To end
the command, press ENTER at the Select Object to
Offset prompt.
IV.10 ARRAY
Creates multiple
copies of objects in a pattern. Each object in an array can be manipulated
independently. If you select multiple objects from which to construct the
array, AutoCAD counts the objects as one item to be copied and arrayed.
Modify
toolbar:

Command
line: array
Creates multiple copies of objects
in a pattern. Use the Rectangular Array option to create an array of rows and
columns of copies of the selected object. Use the Polar Array option to create
an array by copying the selected objects around a center point.
Other options: Select Objects, Preview
Area, Preview
Rectangular
Array
Creates an array of rows and
columns of copies of the selected object.
Rows
Specifies the
number of rows in the array.
If you specify one
row, you must specify more than one column. If you specify a large number of
rows and columns for the array, AutoCAD might take a while to create the
copies. By default, the maximum number of array elements that you can generate
in one command is 100,000. The limit is set by the MAXARRAY setting in the
registry. To reset the limit to 200,000, for example, enter (setenv "MaxArray"
"200000") at the Command prompt.
Specifies the
number of columns in the array.
If you specify one
column, you must specify more than one row. If you specify a large number of
rows and columns for the array, AutoCAD might take a while to create the
copies. By default, the maximum number of array elements that you can generate
in one command is 100,000. The limit is set by the MAXARRAY setting in the
registry. To reset the limit to 200,000, for example, enter (setenv
"MaxArray" "200000") at the Command prompt.
Offset
Distance and Direction
Provides a space
for you to specify the distance and direction of the array's offset.
Row Offset
Specifies the
distance (in units) between rows. To add rows downward, specify a negative
value. To specify row spacing with the pointing device, use the Pick Both
Offsets button or the Pick Row Offset button.
Column Offset
Specifies the
distance (in units) between columns. To add columns to the left, specify a
negative value. To specify column spacing with the pointing device, use the
Pick Both Offsets button or the Pick Column Offset button.
Angle
of Array
Specifies the
angle of rotation. This angle is normally 0, so the rows and columns are
orthogonal with respect to the X and Y drawing axes of the current UCS. You can
change the measurement conventions for angles using UNITS. The ANGBASE and ANGDIR system variables affect
the angle of arrays.
Pick Both Offsets
Temporarily closes the
Array dialog box so that you can use the pointing device to set the row and
column spacing by specifying two diagonal corners of a rectangle.
Pick Row Offset
Temporarily closes the
Array dialog box so that you can use the pointing device to specify the
distance between rows. AutoCAD prompts you to specify two points and uses the
distance and direction between the points to specify the value in Row Offset.
Pick Column Offset
Temporarily closes the
Array dialog box so that you can use the pointing device to specify the
distance between columns. AutoCAD prompts you to specify two points and uses
the distance and direction between the points to specify the value in Column
Offset.
Pick Angle of Array
Temporarily closes the
Array dialog box so that you can specify the angle of rotation by entering a
value or using the pointing device to specify two points. You can change the
measurement conventions for angles using UNITS.
The ANGBASE
and ANGDIR
system variables affect the angle of arrays.
Polar Array
Creates an array by copying the
selected objects around a center point.
Center
Point
Specifies the
center point of the polar array. Enter coordinate values for X and Y, or choose
Pick Center Point to use the pointing device to specify the location.
Temporarily closes
the Array dialog box so that you can use the pointing device to specify the
center point in the AutoCAD drawing area.
Specifies the
method and values used to position objects in the polar array.
Method
Sets the method
used to position objects. This setting controls which of the Method and Value
fields are available for specifying values. For example, if the method is Total
Number of Items & Angle to Fill, the related fields are available for
specifying values; the Angle Between Items field is not available.
Total Number of Items
Sets the number of
objects that appear in the resultant array. The default value is 4.
Angle to Fill
Sets the size of
the array by defining the included angle between the base points of the first
and last elements in the array. A positive value specifies counterclockwise
rotation. A negative value specifies clockwise rotation. The default value is
360. A value of 0 is not permitted.
Angle Between Items
Sets the included
angle between the base points of the arrayed objects and the center of the
array. Enter a positive value. The default direction value is 90.
Note You can
choose the Pick buttons and use the pointing device to specify the values for
Angle to Fill and Angle Between Items.
Pick Angle to Fill
Temporarily closes
the Array dialog box so that you can define the included angle between the base
points of the first and last elements in the array. AutoCAD prompts you to
select a point relative to another point in the AutoCAD drawing area.
Pick Angle Between Items
Temporarily closes
the Array dialog box so that you can define the included angle between the base
points of the arrayed objects and the center of the array. AutoCAD prompts you
to select a point relative to another point in the AutoCAD drawing area
Rotate
Items as Copied
Rotates the items
in the array, as shown in the preview area.
Turns the display
of additional options in the Array dialog box on and off. When you choose More,
additional options are displayed, and the name of this button changes to Less.
Specifies a new
reference (base) point relative to the selected objects that will remain at a
constant distance from the center point of the array as the objects are
arrayed. To construct a polar array, AutoCAD determines the distance from the
array's center point to a reference (base) point on the last object selected.
The point used depends on the type of object, as shown in the following table.
Base point settings by object
|
Object type
|
Default base point
|
Arc,
circle, ellipse
|
Center
point
|
Polygon,
rectangle
|
First
corner
|
Donut,
line, polyline, 3D polyline, ray, spline
|
Starting
point
|
Block,
paragraph text, single-line text
|
Insertion
point
|
Construction
lines
|
Midpoint
|
Region
|
Grip
point
|
Set to Object's Default
Uses the default base
point of the object to position the arrayed object. To manually set the base
point, clear this option.
Base Point
Sets a new X and Y base point coordinate.
Choose Pick Base Point to temporarily close the dialog box and specify a point.
After you specify a point, the Array dialog box is redisplayed.
Note To avoid unexpected results, set the
base point manually if you are constructing a polar array and do not want to
rotate the objects.
Select Objects
Specifies the
objects used to construct the array. You can select objects before or after the
Array dialog box is displayed. To select objects when the Array dialog box is
displayed, choose Select Objects. The dialog box temporarily closes. When you
finish selecting objects, press ENTER. The Array dialog box is redisplayed, and
the number of objects selected is shown below the Select Objects button.
Note If you select multiple objects, the base point
of the last selected object is used to construct the array
Preview Area
Shows a preview
image of the array based on the current settings in the dialog box. The preview
image is dynamically updated when you move to another field after changing a
setting.
Preview
Closes the Array
dialog box and displays the array in the current drawing. Choose Modify to
return to the Array dialog box to make changes.
IV.11 BREAK
Breaks
the selected object between two points
Modify
toolbar:

Command
line: break
Select
object: Use an object selection method, or
specify the first break point (1) on an object
The
prompts that are displayed next depend on how you select the object. If you
select the object by using your pointing device, AutoCAD both selects the
object and treats the selection point as the first break point. At the next
prompt you can continue by specifying the second point or overriding the first
point.
Specify
second break point or [First point]: Specify
the second break point (2) or enter f
Second Break
Point
Specifies
the second point for AutoCAD to use to break the object.
First
Point
Overrides
the original first point with the new point that you specify.
Specify
first break point:
Specify
second break point:
AutoCAD erases the portion of the
object between the two points that you specify. If the second point is not on
the object, AutoCAD selects the nearest point on the object; therefore, to
break off one end of a line, arc, or polyline, specify the second point beyond
the end to be removed.
To split an object in two without
erasing a portion, enter the same point for both the first and second points.
You can do this by entering @ to specify the second point.
Lines, arcs, circles, polylines,
ellipses, splines, donuts, and several other object types can be split into two
objects or have one end removed.
AutoCAD converts a circle to an arc
by removing a piece of the circle starting counterclockwise from the first to
the second point.
IV.12 CHAMFER
Bevels the edges of objects. If
both objects you want to chamfer are on the same layer, the chamfer is created
on that layer. Otherwise, the chamfer is created on the current layer. This is
also true for color, linetype, and lineweight.
Modify
toolbar:

Command
line: chamfer
(TRIM mode) Current Dist1 = current, Dist2 = current
Select first line or [Polyline/Distance/Angle/Trim/Method/mUltiple]:
Note Chamfering an associative hatch whose boundary
was defined from line segments removes hatch associativity. If you defined the
boundary from a polyline, associativity is maintained.
First
line
Specifies the first of two edges
required to define a two-dimensional chamfer, or the edge of a
three-dimensional solid to chamfer.
Select
second line:
If the two lines you select are
polyline segments, they must be adjacent to each other or separated by no more
than one segment. If they're separated by one line or arc segment, AutoCAD
deletes the segment and replaces it with a chamfer line.
Polyline
Chamfers an entire 2D polyline.
Select 2D
polyline:
AutoCAD chamfers the intersecting
line segments at each vertex of the polyline. Chamfers become new segments of
the polyline.
If the polyline includes segments
that are too short to accommodate the chamfer distance, those segments are not
chamfered.
Distance
Sets the distance of the chamfer
from the endpoint of the selected edge.
If you set both distances to zero,
AutoCAD extends or trims the two lines so they end at the same point.
Angle
Sets the chamfer distances using a
chamfer distance for the first line and an angle for the second line.
Trim
Controls whether AutoCAD trims the
selected edges to the chamfer line endpoints.
Note Trim sets the TRIMMODE system variable to 1;
No Trim sets TRIMMODE to 0.
If the TRIMMODE system variable is
set to 1, CHAMFER trims the intersecting lines to the endpoints of the chamfer
line. If the selected lines do not intersect, AutoCAD extends or trims them so
that they do. If TRIMMODE is set to 0, AutoCAD creates the chamfer without
trimming the selected lines.
Method
Controls whether AutoCAD uses two
distances or a distance and an angle to create the chamfer.
Multiple
Bevels the edges of more than one
set of objects. AutoCAD displays the main prompt and the Select Second Object
prompt repeatedly until you press ENTER to end the command.
If you enter an option other than
First Object at the main prompt, the prompts for that option are displayed and
then the main prompt is displayed again.
All the chamfers you created with
the Multiple option are removed if you click Undo
IV.13 FILLET
Rounds
and fillets the edges of objects
FILLET rounds the
edges of two arcs, circles, elliptical arcs, lines, polylines, rays, splines,
or xlines with an arc of a specified radius. FILLET also rounds the edges of 3D
solids.
If the TRIMMODE system variable is
set to 1, FILLET trims the intersecting lines to the endpoints of the fillet
arc. If the selected lines do not intersect, AutoCAD
® extends or
trims them so that they do.
If both objects
you want to fillet are on the same layer, AutoCAD creates the fillet line on
that layer. Otherwise, AutoCAD creates the fillet line on the current layer.
The same is true for the fillet color, lineweight, and linetype.
You can fillet
line segments of a polyline that are adjacent, nonadjacent, intersecting, or
separated by one segment. If they are nonadjacent, the polyline segments are
extended to accommodate the fillet. If they are intersecting, the polyline
segments are trimmed to accommodate the fillet. To create a fillet, the
polyline segments must converge within the grid limits when limits checking is
on.
The result is a
single polyline that includes the fillet as an arc segment. All the properties
of this new polyline, such as its layer, color, and linetype, are inherited
from the first polyline selected.
Note Filleting an associative
hatch whose boundary was defined from line segments removes hatch
associativity. If the boundary was defined from a polyline, associativity is
maintained.
Modify
toolbar:

Command
line: fillet
Current
settings: Mode = current, Radius = current
Select first object or [Polyline/Radius/Trim/mUltiple]: Use an object
selection method or enter an option
First
Object
Selects the first of two objects
required to define a 2D fillet or the edge of a 3D solid to fillet.
If you select lines, arcs, or
polylines, AutoCAD extends them until they intersect or trims them at the
intersection. You can fillet two lines with different extrusion directions only
if the Z values of the endpoints of both lines are equal in the current user
coordinate system (UCS).
If the selected objects are
straight line segments of a 2D polyline, they can be adjacent or separated by
one other segment. If they are separated by another polyline segment, FILLET
deletes the segment that separates them and replaces it with the fillet.
More than one fillet can exist
between arcs and circles. AutoCAD chooses the fillet with endpoints closest to
the points you select.
FILLET does not trim circles; the
fillet arc meets the circle smoothly.
Radius
Defines the radius of the fillet
arc.
The value you enter becomes the
current radius for subsequent VR commands. Changing this value does not affect
existing fillet arcs.
Polyline
Inserts fillet arcs at each vertex
of a 2D polyline where two line segments meet.
If one arc segment separates two
line segments that converge as they approach the arc segment, AutoCAD removes
the arc segment and replaces it with a fillet arc.
Trim
Controls whether AutoCAD trims the
selected edges to the fillet arc endpoints.
Trim
Trims the selected edges to the
fillet arc endpoints.
No Trim
Does not trim the selected edges.
Multiple
Rounds the edges of more than one
set of objects. AutoCAD displays the main prompt and the Select Second Object
prompt repeatedly until you press ENTER to end the command.
If you enter an option other than
First Object at the main prompt, the prompts for that option are displayed and
then the main prompt is displayed again.
All the fillets you created with
the Multiple option are removed if you click Undo.
IV.14 EXPLODE
Breaks a compound object into its
component objects. A compound object comprises more than one AutoCAD object.
For example, a block is a compound object.
Modify
toolbar:

Command
line: explode
Select
objects: Use an object selection method and
press ENTER when
you finish
The
color, linetype, and lineweight of any exploded object might change. Other
results differ depending on the type of compound object you're exploding. See
the following list of objects that can be exploded and the results for each.
IV.15 LENGTHEN
Changes
the length of objects and the included angle of arcs. LENGTHEN
does not affect closed objects. The extrusion direction of the selected object
need not be parallel to the Z axis of the current
user coordinate system (UCS).
Command
line: lengthen
Select an object or [DElta/Percent/Total/DYnamic]: Select one
object or enter an option
Object
Selection
Displays the length and, where
applicable, the included angle of the object.
Delta
Changes the length of an object by
a specified increment, measured from the endpoint that is closest to the
selection point. Delta also changes the angle of an arc by a specified
increment, measured from the endpoint that is closest to the selection point. A
positive value extends the object; a negative value trims it.
Changes the length of the object by
the specified increment.
The prompt repeats until you press ENTER
to end the command.
Angle
Changes the included angle of the
selected arc by the specified angle.
The prompt repeats until you press ENTER
to end the command.
Percent
Sets the length of an object by a
specified percentage of its total length. Percent also changes the angle of an
arc by a specified percentage of the total included angle of the arc.
Total
Sets the length of a selected
object by specifying the total absolute length from the fixed endpoint. Total
also sets the included angle of a selected arc by a specified total angle.
Total Length
Lengthens the object to the
specified value from the endpoint that is closest to the selection point.
Sets the included angle of the
selected arc.
Dynamic
Turns on Dynamic Dragging mode. You
change the length of a selected object by dragging one of its endpoints. The
other end remains fixed.
IV.16 PROPERTIES
Command
line: properties
Displays
the properties of the selected object or set of objects. You can specify a new
value to modify any property that can be changed.
§
When more than one object is selected, the
Properties palette displays only those properties common to all objects in the
selection set.
§
When no objects are selected, the Properties
palette displays only the general properties of the current layer and layout,
the name of the plot style table attached to the layer, the view properties,
and information about the UCS.
IV.17 MATCH PROPERTIES
Applies
the properties of a
selected object to other objects
Standard
toolbar:

Command
line: matchprop or painter (or 'matchprop for
transparent use)
Select
source object: Select the object whose properties
you want to copy
Current
active settings: Currently selected
matchprop settings
Select
destination object(s) or [Settings]: Enter s or select one or more objects to
copy properties to
Destination
Object(s)
Specifies
the objects to which you want to copy the properties
of the source object. You can continue selecting destination objects, or press ENTER to apply the properties
and end the command.
Settings
Displays
the Property
Settings dialog box,
in which you can control which object
properties to
copy to the destination objects. By default, AutoCAD selects all object
properties in the Property Settings dialog box for copying.


